-
Advanced
- Full Customization Control Over Webchat Design
- Add webchat to your website
- How to build A.I Assistant
- Enhanced Data Extraction with "Get Data from JSON" Action
- How to use Conditions
- Enhanced Management of WhatsApp Template Failures
- Enhanced External Request Feature
- DT Tutorial: Google Sheet Integration
- Setup story auto reply automation
- How to format date & time
- Common Errors & Solutions
- Combine Messenger Marketing with Email (SMTP)
- Automate Leads Qualification and FAQs
- Appointment scheduling using OpenAI
- Doubletick API Documentation
- Create Templates from Flows
- Implement a Simple Referral System
- Make an External Request
- Get JSON code for Facebook Ads
- Math Calculations inside your bot
- Use your own custom Checkout Page
- Use split traffic to send Random Messages
- Dynamic Content inside a bot
- Provide your Own Translations for built-in flows
- Format Date and Time
- Export PSIDs
- Create Dynamic Gallery from Google Sheet
- Dynamic multiple choice
- Setup a poll within your bot
- Show all articles (14) Collapse Articles
-
Analytics
-
Automations
- Full Customization Control Over Webchat Design
- How to build A.I Assistant
- Enhanced Data Extraction with "Get Data from JSON" Action
- How to use Conditions
- Enhanced Management of WhatsApp Template Failures
- Enhanced External Request Feature
- How to connect Google Sheets
- Platform Simplification Update
- Setup story auto reply automation
- How to Book Appointments Using AI
- How to Collect Data Using AI
- How to send WhatsApp message to new Facebook Lead
- How to send your business location to your customers
- How to convert text to speech using OpenAI ChatGPT
- How to use Questionaire tool
- How to use Triggers & Actions
- How to reply to Instagram comments using ChatGPT
- How to reply to Facebook comments using ChatGPT
- How to combine OpenAI ChatGPT and Elevenlabs to reply with audio message
- Create your first conversation flow
- How to generate images with OpenAI
- How to send broadcast to your Messenger list
- How to send a broadcast message to Telegram contacts
- How to send whatsapp broadcast to your contacts
- How to create unique default reply for each channel
- Send Updates on Instagram
- Automate Leads Qualification and FAQs
- Facebook Lead Ads Automation
- Triggers and Actions
- Generate Images using OpenAI
- Appointment scheduling using OpenAI
- Convert Speech to Text with OpenAI
- Train Your Bot to Reply to Messages
- Show all articles (18) Collapse Articles
-
Claude
-
Condition options
- How to use Conditions
- Enhanced Management of WhatsApp Template Failures
- Enhanced External Request Feature
- How "Follower Count on Instagram" Condition Works
- How "Verified Account on Instagram" Condition Works
- How "Business Follows User on Instagram" Condition Works
- How "Follows Business on Instagram" Condition Works
- How "Message is an Instagram Story Reply" Condition Works
- How "Timezone" Condition Works
- How "Current Channel" Condition Works
- How "Existing Contact" Condition Works
- How "Interacted in Last 24 Hours" Condition Works
- How Conversation Transfer to Human Condition Works
- How Source Condition Works
- How "Contact Created Date (minutes ago)" Condition Works
- How Contact Created Date Condition Works
- How Subscribe to Broadcast Condition Works
- How Gender Condition Works
- How Continent Condition Works
- How Country Condition Works
- How Full Name Condition Works
- How Language Condition Works
- Show all articles (7) Collapse Articles
-
Ecommerce
- How to import products
- How to create basic e commerce flow
- How to automatically transfer order details to a Google Sheet upon customer order placement.
- Ecommerce Categories
- Shipping Settings
- Payment Settings
- Ecommerce Overview
- Sell With Webshop
- Add or Import products
- Delivery Cost based on Location
- Checkout Settings
- Use your own custom Checkout Page
-
Essentials
- How to build A.I Assistant
- Enhanced Management of WhatsApp Template Failures
- Enhanced External Request Feature
- How to connect Google account, Email, and Microsoft account
- Train Your Bot to Reply to Messages
- System Fields
- Custom Field and Get User Data
- Segment Your Audience with Tags
- Notify Admins
- Get Started
-
Flows
- How to build A.I Assistant
- Enhanced Data Extraction with "Get Data from JSON" Action
- How to use Conditions
- Enhanced External Request Feature
- How to Create Option List on WhatsApp
- Create your first conversation flow
- How to automatically allocate conversations to an admin
- How to restore a previous version of a published flow
- How to dynamically block a contact
- How to automatically transfer order details to a Google Sheet upon customer order placement.
- Streamlined Date Comparison in Conditions
- Updated Bot Simulator
- Last User Input Condition
- Dynamic multiple choice
- Personalize conversations with custom fields
-
gemini
-
google
-
Google Messages
-
Grow
-
Guide
- Articles coming soon
-
Inbox
- Full Customization Control Over Webchat Design
- Quick Contact Creation from Inbox
- How to import contacts
- How to ADD files to Knowledge Base
- How to archive a conversation
- How to automatically transfer conversation to human
- How to generate and implement 'saved replies' in Inbox
- How to add note to contact in the Inbox
- How to dynamically block a contact
- How to send a WhatsApp template message from the Inbox
- How to filter contact in the inbox
- How to set up admin notification
- New Agent Performance Metrics in Analytics
- Admin Availability & Collaboration
- Updated Bot Simulator
- Send WhatsApp Template Message from inbox
- Mark a Conversation as a Follow-Up
- Transfer a Conversation to a Human or Bot
- Filter Conversations in Inbox
- Add Notes to a Contact in Inbox
- View Actions Performed in Inbox
- Assign a Conversation to an Admin or Team
- Delete a Contact
- Archive a Conversation
- Block A Contact
- Use saved replies in Inbox
- Send a flow from the Inbox
- Show all articles (12) Collapse Articles
-
Instagram
-
Integration
- DT Tutorial: Google Sheet Integration
- Platform Simplification Update
- How to automatically transfer order details to a Google Sheet upon customer order placement.
- Google Sheets Integration
- Integrate with OpenAI ChatGPT
- Facebook Ads
- Klaviyo
- Pipedrive
- Platformly
- Razorpay
- Make (Formerly known as Integromat)
- Zapier
- Truemail
- Stripe
- PayPal
- MooSend
- Mailerlite
- Mailchimp
- GetResponse
- Dialogflow
- Auto Reply to voice messages using Google Speech to Text
- ActiveCampaign
- Show all articles (7) Collapse Articles
-
Messenger
- Send conversion events to Facebook
- How to send WhatsApp message to new Facebook Lead
- How to reply to Facebook comments using ChatGPT
- How to create Conversation Starter
- How to send broadcast to your Messenger list
- How to dynamically set user menu
- How to dynamically enable and disable message composer on messenger
- Core Components of Messenger bot
- Setup bot Persistent Menu
- Set up Conversation starters
- Auto-reply to comments on Facebook/Instagram posts
- Send Conversion Events to Facebook
- Get JSON code for Facebook Ads
- Messenger Lists for Messenger
- Set up Welcome Message for Messenger
- Set up the Greeting Message
- Send Paid Messages (Sponsored Messages)
- Dynamically disable Messenger message composer
- Show all articles (3) Collapse Articles
-
OpenAI
- How to build A.I Assistant
- Speech/Audio to Text
- How to Book Appointments Using AI
- How to Collect Data Using AI
- How to convert text to speech using OpenAI ChatGPT
- How to reply to Instagram comments using ChatGPT
- How to reply to Facebook comments using ChatGPT
- How to combine OpenAI ChatGPT and Elevenlabs to reply with audio message
- How to generate images with OpenAI
- Automate Leads Qualification and FAQs
- Integrate with OpenAI ChatGPT
- Generate Images using OpenAI
- Appointment scheduling using OpenAI
- Convert Speech to Text with OpenAI
-
Settings
-
SMS
-
Telegram
-
Tips & Tricks
- Full Customization Control Over Webchat Design
- How to build A.I Assistant
- Enhanced Data Extraction with "Get Data from JSON" Action
- How to use Conditions
- Enhanced Management of WhatsApp Template Failures
- Enhanced External Request Feature
- DT Tutorial: Google Sheet Integration
- Platform Simplification Update
- Quick Contact Creation from Inbox
- Setup story auto reply automation
- How to generate images with OpenAI
- Streamlined Date Comparison in Conditions
- Common Errors & Solutions
- Automate Leads Qualification and FAQs
- Copy a Flow to another page
- Maximum file/video size
- Enable the bot for admins only
- Connect multi providers for login
- Show all articles (3) Collapse Articles
-
Tools
- Full Customization Control Over Webchat Design
- How to build A.I Assistant
- How to use Conditions
- Enhanced External Request Feature
- How to use 'Split Traffic' tool
- How to use the 'Wait' action
- Appointment scheduling manager
- Setup a poll within your bot
- Bot Simulator
- Allow your customer to find places near them
-
Tutorial Videos
- How to build A.I Assistant
- How to use Conditions
- How to connect Google Sheets
- DT Tutorial: Google Sheet Integration
- How to Create Option List on WhatsApp
- How to import contacts
- Setup story auto reply automation
- Speech/Audio to Text
- How to analyze image using Claude Vision
- How to Book Appointments Using AI
- How to Collect Data Using AI
- How to ADD files to Knowledge Base
- Improve customer service with Google Gemini
- Setup AI Claude Chatbot
- How to send WhatsApp message to new Facebook Lead
- How to send your business location to your customers
- How to convert text to speech using OpenAI ChatGPT
- How to use Questionaire tool
- How to enable users to explore the entire catalog on WhatsApp
- How to use Triggers & Actions
- How to reply to Instagram comments using ChatGPT
- How to reply to Facebook comments using ChatGPT
- How to automatically distribute conversation between agents
- How to combine OpenAI ChatGPT and Elevenlabs to reply with audio message
- How to use 'Split Traffic' tool
- How to use the 'Wait' action
- How to import products
- Create your first conversation flow
- How to generate images with OpenAI
- How to archive a conversation
- How to create Conversation Starter
- How to send broadcast to your Messenger list
- How to send a broadcast message to Telegram contacts
- How to send whatsapp broadcast to your contacts
- How to change your account profile image
- How to rename your account
- How to create unique default reply for each channel
- How to dynamically set user menu
- How to dynamically enable and disable message composer on messenger
- How to format date & time
- How to setup a telegram bot
- How to use external request
- How to round numbers up
- How log custom event action works
- How to check flow analytics
- How to set up SMTP
- How to automatically transfer conversation to human
- How to generate and implement 'saved replies' in Inbox
- How to automatically allocate conversations to an admin
- How to automatically tag a conversation for follow-up
- How to restore a previous version of a published flow
- How to export contact's data
- How to add note to contact in the Inbox
- How to dynamically block a contact
- How to dynamically set custom field
- How to view executed actions in the Inbox
- How to create basic e commerce flow
- How to automatically transfer order details to a Google Sheet upon customer order placement.
- How to send a WhatsApp template message from the Inbox
- How Development Mode works
- How to add agent/admin to your account
- How to connect Google account, Email, and Microsoft account
- How to filter contact in the inbox
- How to set up admin notification
- How to retrieve files from users with the 'get user data' action.
- How to carry out mathematical operations
- Transfer content between accounts using a template.
- How to get a user's location via WhatsApp?
- Enabling users to discover nearby locations
- Show all articles (54) Collapse Articles
-
Viber
-
Voice
-
WebChat
-
WhatsApp
- Get started with WhatsApp Automation
- Enhanced Management of WhatsApp Template Failures
- How to Create Option List on WhatsApp
- How to send WhatsApp message to new Facebook Lead
- How to send your business location to your customers
- How to enable users to explore the entire catalog on WhatsApp
- How to send whatsapp broadcast to your contacts
- How to send a WhatsApp template message from the Inbox
- Adding a Profile Photo to WhatsApp Business API Account
- Facebook Lead Ads Automation
- Send WhatsApp Template Message from inbox
- WhatsApp Commerce
- Send a broadcast message to WhatsApp contacts
- Whatsapp Display Names
- Whatsapp Pricing
- Get user’s location on WhatsApp, Viber and Telegram
- Show all articles (1) Collapse Articles
Create Dynamic Gallery from Google Sheet
It is now possible to create a dynamic gallery from any Google Sheet you have created. It opens up a ton of options where you are able to have the full power of Google Sheets available
So how do we start using it?
Connect your Google Sheets account
Before anything else be sure to connect Google Sheets with Doubletick if you did not do so already. If you need help with setting that up you can do so here
Creating the Dynamic Gallery
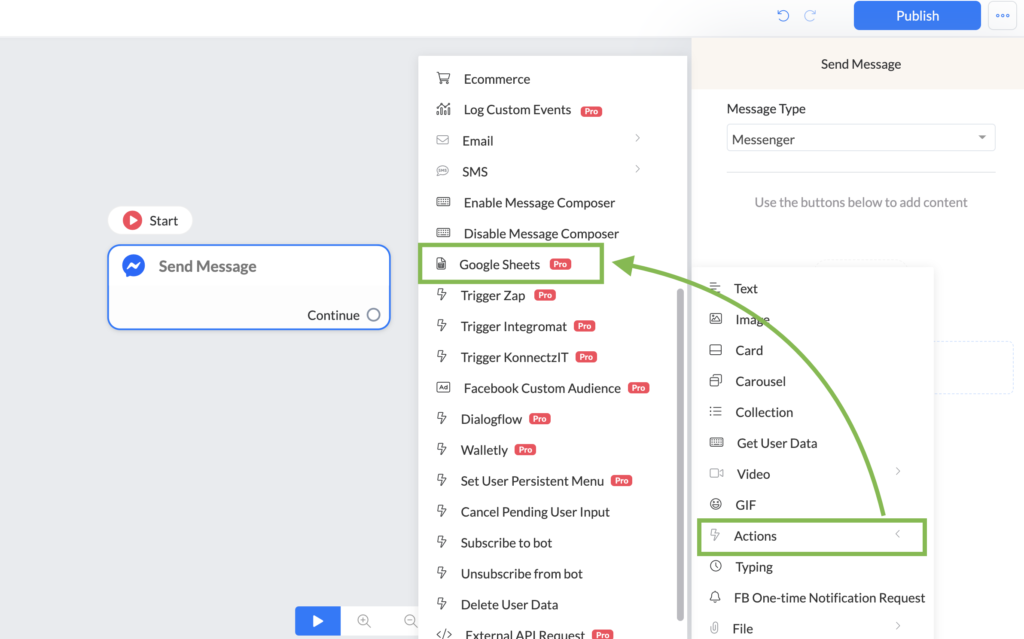
In order to do so go to your flow builder and use the action Google sheets -> Generate Dynamic Gallery from any Google Sheet.
From here you connect your spreadsheet and the worksheet you want to use. You will then see a gallery card appear and it is from here that you will build your own gallery card.

As you can see it is a really visual way of creating your gallery card.
To populate the image url, Title and subtitle you use the columns that are available in your Google Sheet. If you press the { or the variable icon you will get to see your available columns by name, which makes it really easy to select the correct one.

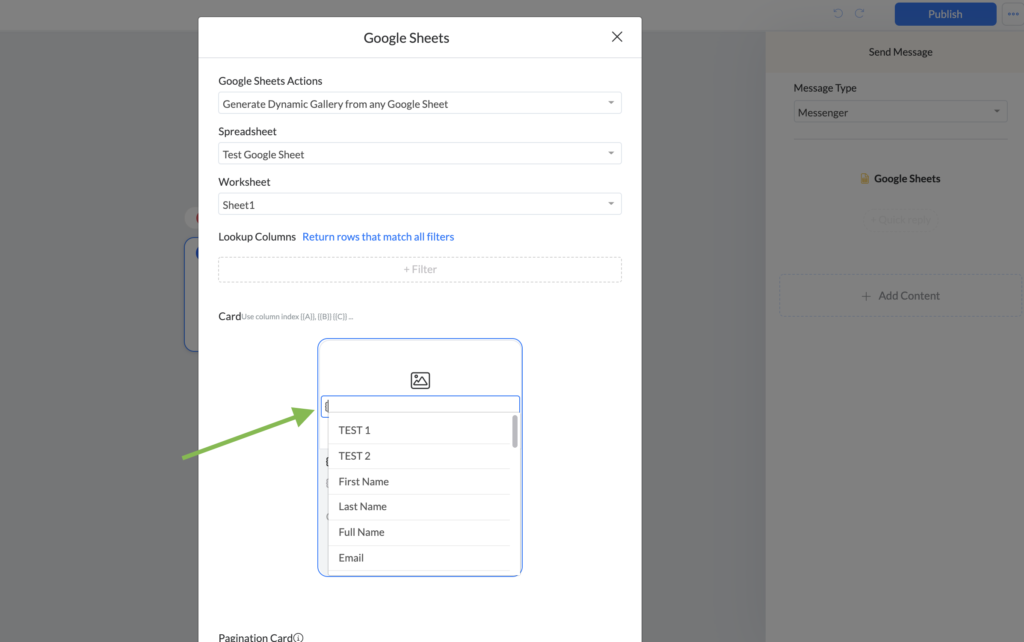
You can select the correct columns very easily. Do make sure that when selecting the column for the image that you have inserted a correct URL inside that column. Otherwise, you might get an error when trying to view the gallery card. You will also have access to all the other variables if you want more customization or personalization.
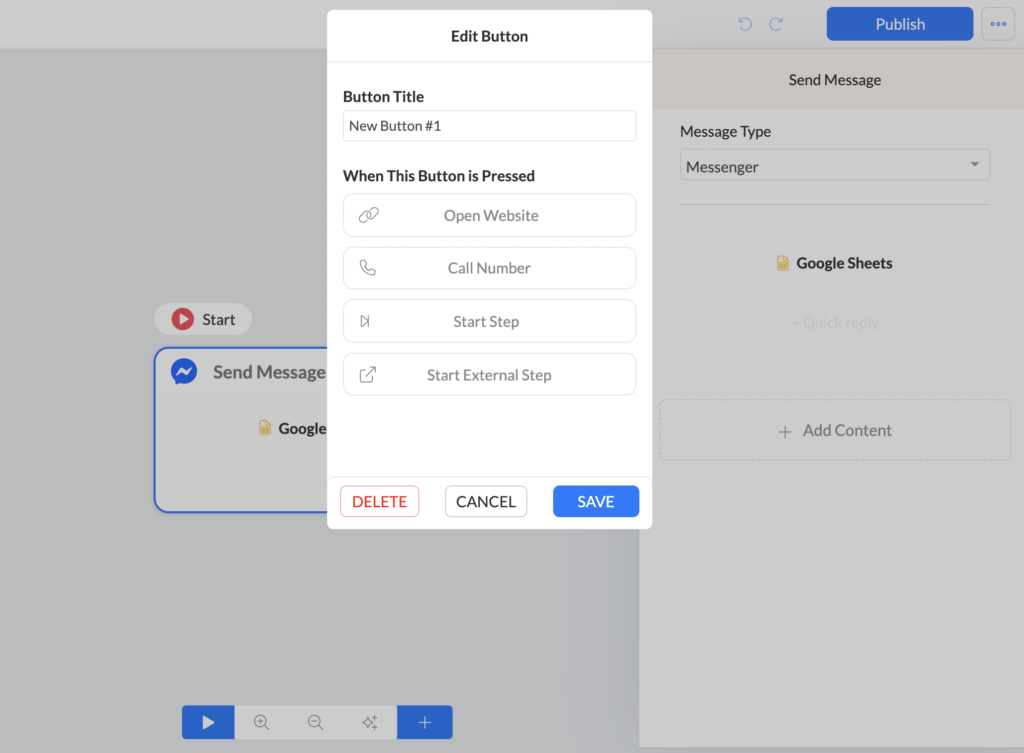
Once you’ve selected your desired columns you can also add a button if you wish. When pressing the button you will have a few options to choose from just like when you create a normal button.
Those options are:
- Open website
- Call number
- Start step
- Start external step

When you choose an option then you will also be able to perform additional actions. There are no restrictions to the amount of actions you can set up. But there is one limitation and that is set by Facebook unfortunately. But we will get in to that more later.
How to provide dynamic information based on chosen option
So far we have learned how to set up a dynamic gallery card. Now it is time to work on how to provide the following information and use additional actions to truly understand how easy but incredibly powerful this new integration is.
Let’s take a look at a sample sheet

We have two items here that display a Plain Frappuccino and Caramel Frappuccino. Depending on the choice the subscriber takes we want to show the detailed description matching that choice.
To set this up we need to press the more info button we set up on the gallery card in the Google sheet action. When pressed we can choose an additional action that is called the Set Custom field.
From here a pop-up window will appear and we will be able to set the custom field of our choice with a value.
We will choose Column D (inserted as {{C}} as that provides the details we would like to display.
Once done press the button save to complete the action. Then press save once again to exit the Gallery card set up.
So let’s see how this looks like in the backend so far

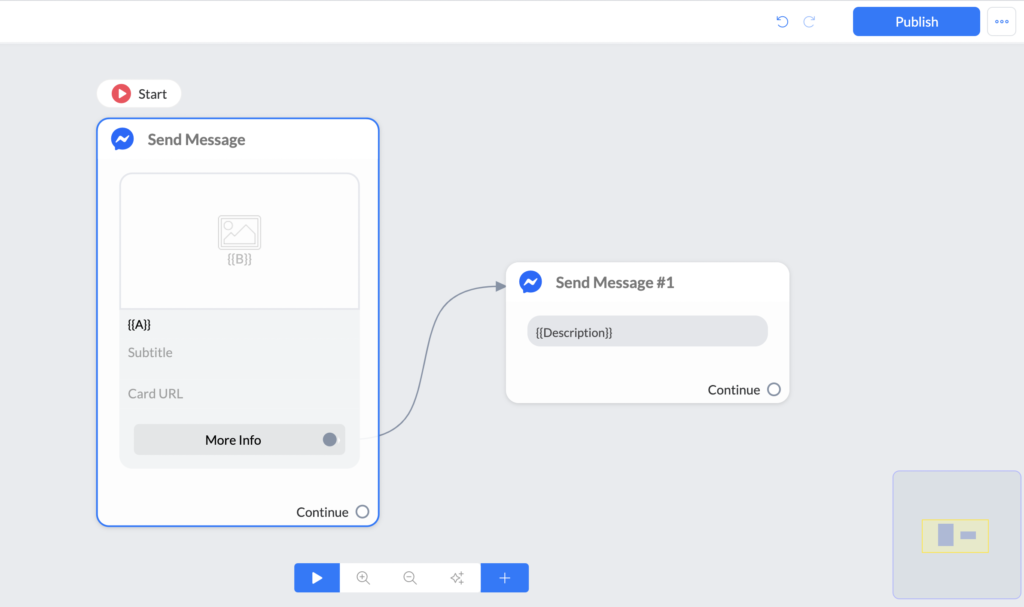
It looks really basic right?
See how easy it is to show information that is stored in any column inside your Google Sheet?
Just use the action set custom field and set the value to the column that will contain the information.
If you wanted to show multiple columns you can do so by just adding them after the first one.
So this would look like: {{A}} {{B}}
Additional actions examples
To show you how easy it is to use this new integration we are going to provide an example of the additional actions you could use to make it a really powerful combination.
Segmenting your audience
It is very easy to segment your audience based on their last view product or item in the dynamic gallery.
To enable this we will insert another additional action set custom field. Now we will set a custom field called Last_viewed_product to the value of the Product Name in the Google Sheet.

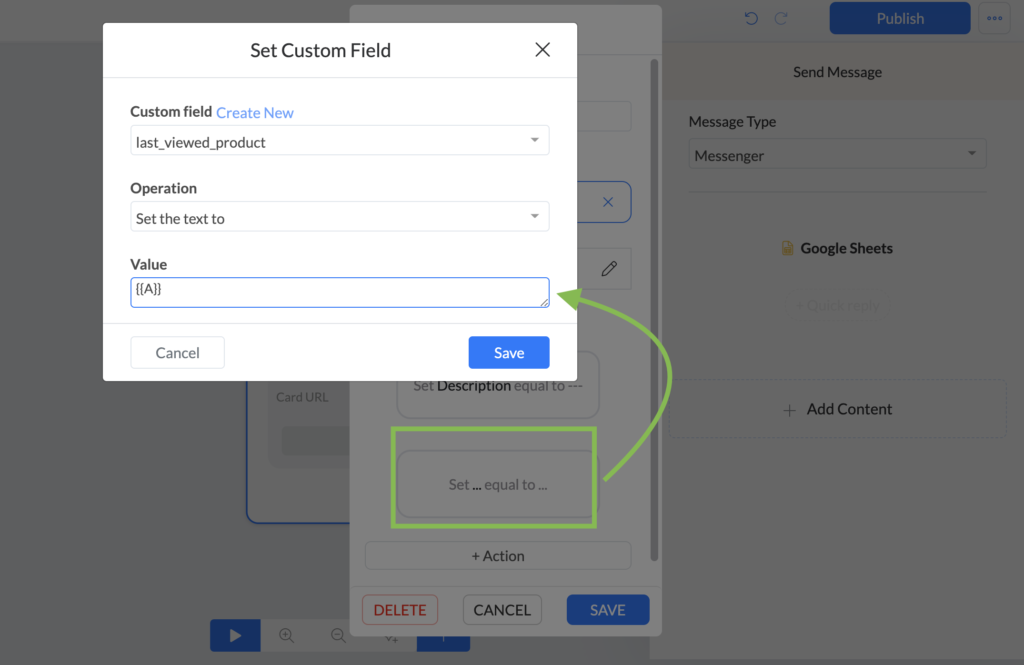
Since the column is the first one the only thing we need to do is use the value {{A}}.
That’s it!
Nothing more to do.
Now when segmenting subscribers it is not advised to use tags at this step, as the tags cannot be set up Dynamically like the action Set custom field can.
But you can still tag that user in the next step if you like. After the button press you could add a condition that checks a users choice by using the last custom field action we set up.
That can look something like this;

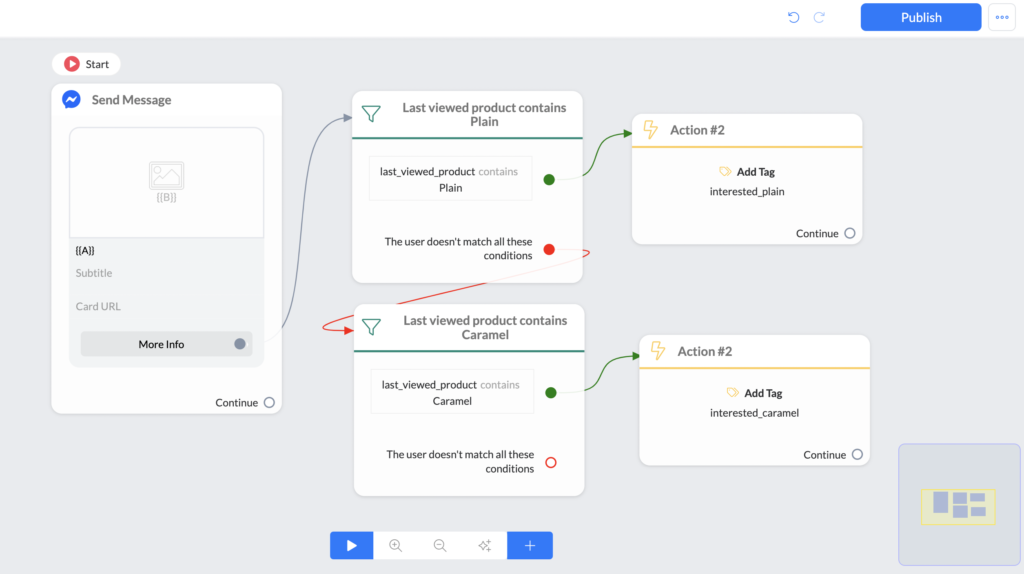
But as you know you can segment by custom fields as well as tags so the above set up may not apply to you.
Segmenting your audience is important though since you can send personalized follow-ups that increase conversions and engagement.
Facebook limitation with additional actions
As mentioned we would also come back on the topic of the limitations.
The current limitation set by Facebook is that whenever you want to set a Custom field the amount of characters can not be larger than 1000 characters. In most cases this will not be an issue, but if you are storing a detailed description from your Google Sheets or combining multiple column values to a custom field you might exceed the amount of characters.
So keep this in mind when setting a custom field with values inside your Google Sheet. But in general you will never exceed this limit. We wanted to point this out to you if you might get an error that this is probably the reason.